Fishing Tips
-
03/28/2025Loading MoreFishing is both a relaxing and challenging activity, but improper maintenance of your gear can affect your fishing experience and even shorten the lifespan of your equipment. Today, we are sharing a comprehensive fishing gear maintenance guide to help you keep your equipment in top shape for every trip!
1. Reel Maintenance: Keep It Running Smoothly
Keywords: reel maintenance, how to care for fishing reels
The fishing reel is one of the most delicate components of your gear, and proper maintenance is essential:
- Rinse with fresh water: After each use, rinse the reel with warm water to remove salt and dirt.
- Lubricate regularly: Apply specialized reel lubricant to keep the gears running smoothly.
- Store in a dry place: Avoid humid or high-temperature environments, and always dry the reel before storing it.
2. Fishing Line Care: Prevent Breakage and Aging
Keywords: how to care for fishing lines, fishing line lifespan
Fishing lines can degrade over time, becoming brittle and weak. Here are some key maintenance tips:
- Avoid direct sunlight: UV rays accelerate line aging, so store it in a cool, shaded place.
- Replace regularly: Check your fishing line every 2-3 months, and replace it if it appears rough or discolored.
- Store properly: Avoid excessive tension when winding the line onto the spool to prevent damage.
3. Hook and Tackle Maintenance: Prevent Rust and Bluntness
Keywords: fishing hook maintenance, how to prevent hook rust
Hooks, swivels, and other small accessories can rust or become dull, reducing your catch rate:
- Rinse and dry: After each trip, rinse with fresh water and let them dry completely.
- Rust prevention: Store them with desiccants or apply a thin layer of anti-rust oil.
- Regular inspection: Sharpen dull hooks with a hook sharpening stone or replace them as needed.
4. Rod Maintenance: Avoid Breakage and Wear
Keywords: fishing rod maintenance, how to prevent rod breakage
Fishing rods are the backbone of your gear, and proper care can significantly extend their lifespan:
- Clean the rod surface: Wipe down the rod with a damp cloth to remove dirt and debris.
- Store with care: Avoid excessive pressure on the rod and use a dedicated rod bag for protection.
- Do not overload: Use rods within their designated power range to prevent breakage.
5. Proper Storage: Organize and Protect Your Gear
Keywords: fishing gear storage, how to store fishing equipment
Proper storage can help maintain the condition of your fishing gear and prevent damage:
- Organize by category: Store rods, reels, lines, and accessories separately to prevent scratches and tangles.
- Keep dry and dust-free: Use fishing gear storage boxes or sealed bags to prevent moisture buildup.
- Inspect before every trip: Check your equipment before each outing to avoid any surprises.
Conclusion: Proper Maintenance for Longer-Lasting Gear!
Regular maintenance of your fishing gear not only extends its lifespan but also enhances your fishing experience. We hope this guide helps you keep your gear in top condition for many successful trips!
How long does fishing gear last?
The lifespan of fishing gear varies by type and usage, but generally:
- Rods: 5-10 years
- Reels: 5-15 years
- Lines: 1-3 years (depending on material)
- Lures and tackle: 5+ years with proper care
Regular maintenance can extend the life of your fishing gear.How to fix fishing rod durability?
To fix fishing rod durability, consider the following steps:
**Inspect the rod** for any visible damage, like cracks or breaks.
**Replace damaged guides** by unscrewing and reattaching new ones.
**Wrap and reinforce weak areas** with fishing rod wrapping thread and epoxy.
**Use a rod sleeve or case** to protect it during transport.
**Avoid extreme temperatures** and store the rod in a cool, dry place.
**Regularly clean the rod** with mild soap and water to prevent corrosion.
**Check the reel and line**, ensuring they are in good condition to reduce strain on the rod.
Implement these steps to enhance the longevity of your fishing rod. -
02/21/2025Loading MoreWhen it comes to fishing, having the right tools can make a world of difference. Among these tools, a reliable pair of fishing pliers is essential for cutting lines, removing hooks, and handling various rigging tasks. However, not all fishing pliers are created equal. Inshore and offshore fishing require different types of pliers due to variations in water conditions, target species, and environmental factors. In this guide, we’ll break down the key differences between inshore pliers and offshore pliers, helping you make an informed decision when selecting the right tool for your fishing adventures.
Â
Â
1. Materials & Corrosion Resistance
-
Inshore Pliers: Typically made from aluminum or stainless steel, these pliers are designed for use in brackish or saltwater environments with moderate exposure to corrosive elements. Many inshore pliers come with anodized coatings or anti-rust treatments to extend their lifespan.
-
Offshore Pliers: Offshore fishing exposes gear to extreme saltwater conditions, requiring heavy-duty, corrosion-resistant materials like titanium. Offshore pliers need to withstand prolonged exposure to salt spray and high humidity without rusting or degrading.
Â
Â
2. Strength & Durability
-
Inshore Pliers: Since inshore fishing generally targets smaller species like redfish, snook, and trout, inshore pliers are designed to be lightweight and easy to handle. While durable, they may not be built to withstand high-pressure situations.
-
Offshore Pliers: Offshore fishing often involves battling large, powerful fish such as tuna, marlin, and swordfish. Offshore pliers are engineered for maximum durability, featuring reinforced construction and heavy-duty jaws capable of handling thick hooks and tough leader materials.
Â
Â
3. Cutting Power & Functionality
-
Inshore Pliers: Equipped with standard cutters, these pliers are efficient for cutting mono and light fluorocarbon lines but may struggle with heavy braided or wire lines.
-
Offshore Pliers: Offshore pliers feature dual cutters, allowing for effortless cutting of braid, mono, fluorocarbon, and even wire. A good offshore plier should also include replaceable tungsten carbide cutters to maintain long-term sharpness.
Â
Â
4. Grip & Ergonomics
-
Inshore Pliers: Designed for comfort and versatility, inshore pliers typically have ergonomic handles with non-slip grips.
-
Offshore Pliers: Offshore conditions can be rough and wet, making enhanced grip and control crucial. Offshore pliers often have textured, rubberized, or contoured handles to provide a secure grip, even in challenging conditions.
Â
Â
Why Choose the Gomexus Offshore Plier X?
If you’re looking for the ultimate offshore fishing plier, the Gomexus Offshore Plier X Titanium Fishing Pliers 7.5'' is a top-tier choice. Here’s why:
✅ Premium Titanium Construction – 100% corrosion-resistant, perfect for harsh saltwater environments.
✅ Heavy-Duty Dual Cutters – Effortlessly cuts braid, fluorocarbon, mono, and even wire.
✅ Ergonomic Non-Slip Grip – Provides maximum control even in wet conditions.
✅ Spring-Loaded Design – Reduces hand fatigue and ensures easy one-handed use.
For serious offshore anglers, investing in high-quality pliers like the Gomexus Offshore Plier X ensures durability, functionality, and peak performance.
Â
Â
Final Thoughts
Choosing between inshore and offshore pliers depends on where and how you fish. If you mainly fish in calmer, inshore waters, a lightweight aluminum or stainless-steel plier might suffice. However, if you frequently battle the rough conditions of offshore fishing, a titanium, heavy-duty plier like the Gomexus Offshore Plier X is a must-have.
No matter your fishing style, having the right pliers on hand will enhance your efficiency and overall experience on the water. Ready to upgrade your fishing gear? Check out the Gomexus Offshore Plier X today!
-
-
12/12/2024Loading MoreChoosing the Right Gear
- Rod and Reel Combo: Opt for a beginner-friendly combo that's easy to use and durable. Consider a spinning rod and reel combo for versatile fishing.
- Line: Choose a line weight that matches your reel size and target fish. A good starting point is a 10-12lb test line for most freshwater applications.
- Lures and Baits: Start with simple lures like spinners, crankbaits, and soft plastic baits. For bait fishing, worms, crickets, and minnows are good choices.
Mastering Basic Techniques
- Casting: Practice your casting technique to improve accuracy and distance. Start with a simple overhead cast and gradually work your way up to more advanced techniques.
- Retrieving: Experiment with different retrieve speeds and techniques to entice fish. A steady retrieve, a jerky retrieve, or a combination of both can be effective.
- Hook Setting: A firm hookset is crucial to ensure a successful catch. Practice your hook-setting technique to avoid losing fish.
Tips for Beginner Anglers
- Start with Simple Techniques: Don't overwhelm yourself with too many complex techniques. Focus on mastering the basics.
- Find a Fishing Buddy: Fishing with a friend can be more enjoyable and you can learn from each other.
- Join a Fishing Club or Forum: Connect with other anglers, share experiences, and learn new techniques.
- Respect the Environment: Practice catch-and-release for certain species, dispose of trash properly, and avoid disturbing wildlife.
- Have Fun: Remember, fishing is a relaxing and enjoyable hobby. Don't get too caught up in the competition.
Taking Your Fishing to the Next Level
If you're looking to enhance your shore fishing skills, consider the following tips:
- Understand Tide Patterns: Learn how tides affect fish behavior and choose the best time to fish.
- Explore Different Locations: Try fishing from different locations, such as piers, jetties, and beaches.
- Experiment with Different Lures: Different lures can attract different fish species. Experiment with various types of lures to find what works best.
- Learn to Read the Water: Pay attention to water temperature, current, and underwater structure to identify potential fishing spots.
By following these tips and practicing regularly, you can become a skilled angler and enjoy countless hours of fun on the water.
-
11/07/2024Loading MoreGetting back into fishing?
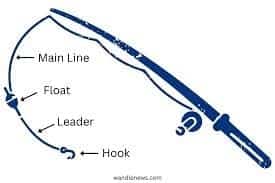
You’ve got your braided line ready, but you’re thinking, "Why do I need a leader?"
It’s a fair question, and one a lot of anglers ask.Let’s get to the point.
When I first started, I thought using two different lines was unnecessary.
Why not just stick with the braided line?
But once I understood the benefits, it changed my whole fishing game.Let’s break it down.
The Perks of Braided Line
The braided line is strong, and sensitive, and allows you to cast far.
But it’s not perfect for everything.
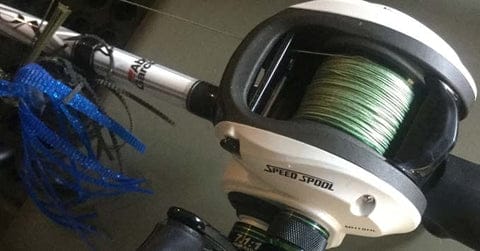
What’s the Catch with Braided Line?
- Thin but strong: Braided line is great for strength, but it’s thin, which means fish can see it in clear water.
- Not very abrasion-resistant: If you cast near rocks, or fish in thick weeds, you risk fraying or snap-offs.
Enter the Leader
This is where a leader comes in.
Think of it as the buffer between your braided line and the fish.
Here’s why it’s a game-changer:- Invisibility: Fish can’t see fluorocarbon or mono lines as easily.
- Better protection: Mono and fluoro are more abrasion-resistant, so they hold up better when fishing around rocks or weeds.
- Shock absorption: The braided line doesn’t stretch, which can make fights with bigger fish more difficult. Adding a mono leader gives you that extra stretch, saving your gear.
Mono vs. Fluoro: Which Leader Should You Use?
Now that you know the purpose of the leader, here’s how to pick one.
1. Monofilament Leader (Mono)
- Stretchy – good for absorbing shock when fighting big fish.
- Easier to manage – great for beginners.
- Affordable – a good all-rounder.
2. Fluorocarbon Leader (Fluoro)
- Invisible – perfect for clear water, fish won’t see it.
- Durable – it’s tough and resists fraying.
- Sinks fast – better for bottom fishing.
How Do You Tie a Leader to Your Braided Line?
Good question.
Here are two knot options:- Uni-to-Uni Knot: Easy, reliable, and great for connecting braid to leader.
- FG Knot: Strong and slim, it helps the line glide through the rod guides with less resistance.
When Should You Use a Leader?
Not every fishing situation needs a leader, but here’s when it’s a must:
- Fishing in Clear Water: Use fluorocarbon to keep your line invisible.
- Fishing Around Rocks or Weeds: Both mono and fluoro offer better protection.
- Targeting Big Fish: Leaders give you the stretch and strength needed for those tough fights.
What’s the Right Leader Length?
For most situations, a leader length of 3 to 5 feet is perfect.
You want enough leader in the water to do its job, but not so much it weighs you down.FAQs: Quick Answers to Common Questions
-
Do I really need a leader with braided line?
Yes! If you're fishing in clear water or around rocks, or if you’re after bigger fish, a leader will help protect your braid and make your setup more effective. -
Can I use any leader with braided line?
You can, but fluorocarbon is often best because it’s tough and invisible. Monofilament is also fine, especially if you need some extra stretch. -
What’s the best knot for tying a leader to braid?
The Uni-to-Uni knot is simple and strong. The FG knot is a bit more advanced but gives you a smooth connection.
Final Thoughts: A Leader Makes a Big Difference
Here’s the deal:
A braided line setup without a leader is like driving a sports car without brakes.
It might work for a while, but sooner or later, you’ll run into problems.A good leader upgrades your fishing setup.
It helps with line invisibility, and abrasion resistance, and gives you more control when fighting fish.Next time you’re out on the water, try adding a leader to your braid.
Trust me, it’ll make a huge difference. -
10/24/2024Loading More
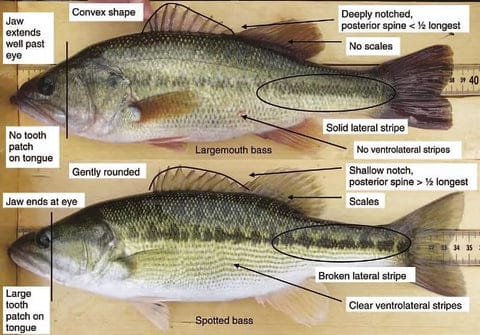
Largemouth and spotted bass are two of the most sought-after freshwater game fish in North America. While they may look similar at first glance, there are several key physical characteristics that can help you accurately identify these species.
Body:
1. Jaw:
- Largemouth bass: The lower jaw extends well past the eye.
- Spotted bass: The lower jaw ends at the eye.
2. Mouth:
- Largemouth bass: No tooth patch on the tongue.
- Spotted bass: A large tooth patch on the tongue.
3. Lateral stripe:
- Largemouth bass: Solid lateral stripe.
- Spotted bass: Broken lateral stripe with clear ventrolateral stripes.
4. Scales:
- Largemouth bass: Scales extend onto the lower cheek.
- Spotted bass: Scales on the lower cheek are smaller than those on the rest of the body.
5. Dorsal fin:
- Largemouth bass: Continuous dorsal fin.
- Spotted bass: Divided dorsal fin with a noticeable notch between the spiny and soft sections.
6. Coloration:
- Largemouth bass: Typically have a greenish-brown coloration with dark spots or blotches.
- Spotted bass: Usually have a darker green coloration with more pronounced spots, especially along the lateral line.
Additional Tips:
- Size: Largemouth bass generally grow larger than spotted bass, but there can be exceptions.
- Habitat: Largemouth bass are more tolerant of a wider range of water conditions, while spotted bass prefer clearer, cooler waters.
- Behavior: Largemouth bass are often more aggressive and prone to jumping when hooked, while spotted bass tend to be more subdued.
Conclusion:
By carefully examining these physical characteristics, you can confidently identify whether you've caught a largemouth or spotted bass. This knowledge can be valuable for anglers who enjoy targeting specific species or for those who simply want to learn more about the fish they catch.


